Clash of Clans Base Design Guide

Chapter 1: Beginning from the Beginning
When you first start on Clash of Clans, you are given a tutorial. Note that you don't have to spend the gems it recommends and you do not need an army of wizards to take out the goblins. After you have completed this tutorial and got to grips with the game, you have several looming problems.
You will have a three day shield, this is essential in getting your defenses and resource buildings to a safe level before being attacked.
The first thing you need to do is upgrade your Elixir Collectors and Gold Mines to a sensibly high level. I recommend at least level 3 or 4 at first. This will give you enough of a resource base to keep you going for a while.
Once you have completed this, you need to see to your storages. You have a maximum of two storages of each, elixir and gold, and it is probably best to get both to maximize your resource amounts.
Don't worry too much about Barracks and Army Camp upgrades at this early stage as they won't protect you from invasion and will only help when you are on the offensive, but do try and get your Town Hall to level three.
As soon as you have completed these tasks you must turn to your defensive buildings. You will already have a cannon from the tutorial but apart from that, your first defenses need to be your most important ones, walls. Use all your walls around your buildings, bear in mind that the buildings that are most valuable are your storages and your Town Hall, make sure you can surround your storages and town hall completely but remember that enemies can spawn in the corner too, it's not safe to build with no walls in the corner.
Surround your base with the less important buildings to slow your attackers and upgrade your walls to at least level 2.
When you are confident your base is stable, begin Town Hall level 4 upgrade and begin building your cannons and archer towers. Upgrade them as much as possible and save up to get a mortar as soon as you can. Put the mortar with your TH and your storages in your walls and keep upgrading them. You want to fit as many of your defensive turrets in your walls as you can whilst keeping your less useful ones outside your base. Keep upgrading your walls and your turrets and you are ready to face the world.
Chapter 2: Your First Raid
Since your three day shield is such a blessing, it is not advised that you break it early. Once it has run out however, you are ready to go out in search of trophies, gold and elixir.
Attacking involves three fundamental parts each covered in depth here, they will be explored later in terms of applying them at higher levels.
Part 1 - Army composition
At later levels army composition is an essential part of strategy. Based on the type of bases you will encounter at first however, I recommend a simple army of Barbarians at first. This should help guarantee a win against anyone with badly used walls and defenses.
Before you begin your battle, it is a good idea to upgrade your barracks. By the time you have finished raiding they will be done.
Part 2 - Picking the perfect base
At this earlier a level, you can afford to be picky on who you attack. Huge numbers of people begin the game and then quit very quickly so you can look through bases to find the best catch. Ideally, you want a base that you can 3-star for a large amount of trophies so as to lift you up into the trophy levels of active players.
Look for no, or badly deployed, walls with an exposed Town Hall and weak defenses. Ultimately however, you want someone with a good amount of resources and at least 25 trophies up for grabs. Winning a battle like this will set you well on your journey to the leader boards.
Part 3 - Strategy
Strategy is a pretty endless subject. However, there are countless variations on attack techniques. I thoroughly recommend you simply target the defenses and the Town Hall with your Barbarians until a greater variety of troops are available.
Chapter 3: Defensive Strategies
Part 1 - Defensive Units
After beginning and finishing Town Hall level 4 upgrade, build an Air Defense as soon as possible and begin to upgrade your defensive buildings in this order - Mortar, Archer Tower, Cannon . Once Mortar is level 2, begin your Archer Tower upgrade. Once that is level 4, start your Cannon upgrade. Once that is level 5 (This may take some time), try to max out your walls and put everything neatly in place. If you have problems with your layout, check noteworthygamer's YouTube channel (http://www.youtube.com/user/NoteworthyGames) for a guide. Once you get your first defense result, see if you had won or lost. If you lost, try a different layout. If you won, you are ready to rock the leaderboards.
Part 2 - Hitpoints
As higher players have noticed, upgrading your buildings will increase the number of times a building has to be hit. This is most effective to defensive buildings and especially the Clan Castle. Try to upgrade as much buildings as you can, but start with your defenses.
Chapter 4: Base Design
Are you farming or hunting trophies?
Position the structures you want to protect most (usually gold storage, town hall, or both) in the middle, within firing range of all your defences.
Followed by mines, collectors, drills. By positioning them on the outside of your defences, your defences can focus on defending your most important buildings. You defences will still attack enemy units within range.
Followed by misc. buildings that won't give resources but act as buffers to your resources let long range defensive structures like mortars and archer towers to deal some damage to troops.
Chapter 5: Farming
Pick and choose your targets. You're farming, not trophy hunting.You're looking for targets with lots of available resources and defences weak against your army.
For less experienced players, we would reccomend a simple army of Goblins, up to your max if your army camps store less than 30, if your army camps store at least 50, it is a good idea to make your army with 30-35 Goblins, at least 2 giants, and the rest archers.
If you have at least 100 space in your army camps, we would reccomend the simple goblin army, or 60-70 Goblins and the rest Balloons, Giants, Dragons, P.E.K.K.A.s, or Golems as a meat shield.
Chapter 6: Trophy Hunting
Pick and choose your targets. You're trophy hunting, not farming.
You're looking for targets with exposed town halls or defenses weak against your army.
Chapter 7: Balancing your Base
Keeping a balance with your base.
You should always try to max out everything for your town hall level so that you get the best advantage when you upgrade the town hall.
When upgrading the buildings, try to upgrade the defensive buildings first then try to upgrade the Resource Buildings, followed by your useless Barracks, Lab, Spell Factory and Army Camps.
You should always try to be upgrading something in the lab as it does not require a builder to do so. Also when the tier 1 infantry get to a high level they can can dish out monstrous damage.
Always upgrade your buildings in the least time consuming way, so try to keep all your cannons in the same level (5&6) instead of having them spread apart (10&2).
Also not all defensive structures are the same. It is important to have a centralised Clan Castle and a mortar triangle in the center, all covered by walls and with the wizard towers there to protect the mortars as the mortars have a "Dead Zone"(they do splendid splash damage to your enemies and will also destroy tonnes of enemies while the enemy is destroying other buildings.
You should ALWAYS have at least 1 air defense centralised as if someone is attacking with 12 dragons, your air defense may have a chance of destroying the enemy. Also if you have all 4 air defenses centralised it is ok to keep them at about level 4-5 but if you only prioritise 1 air defense you MUST make sure it is MAX LEVEL for you current town hall level.
Remember: Having a powerful army is very important because you have a better chance of destroying the enemy's defense and stealing all their loot. Also make a good defense and if you are trying to protect resources I highly recommend placing the town hall outside so there is higher chance of a weaker player destroying your town hall. (giving you a shield)
Really, Really, Quick DOs and DON'Ts
DO:
§ Upgrade your Elixir Collectors and Gold Mines to a high level (level 5 for all of them is a good goal by the end of the 48 hours if you're an active player).
§ Upgrade your Elixir Storage and Gold Storage as needed.
§ Attack the goblins in the Single Player Campaign (good income for the first day or two).
DO NOT:
§ Build a second Gold Storage OR a second Elixir Storage (yet).
§ Bother with building defenses before the last ~24 hours of your shield.
§ Attack other players in multiplayer (it gets rid of your shield prematurely).
§ Spend Gems (more on this later).
Frequently Asked Questions
What happens when I'm attacked?
If you are attacked you can lose some Resources and a few Trophies (more on Trophies later, they are unimportant for now). That is it. Period. Any Buildings, Defenses or Walls that are damaged or destroyed pop right back up with no penalty. Traps that are triggered need to be re-purchased (they are one-time use).
This means there is NO penalty at all if Army Camps,Barracks, Builder's Huts, Walls or Defenses are destroyed.
If Gold Mines, Elixir Collectors, Gold Storages or Elixir Storages are damaged or destroyed, some of the Resources they contained will be stolen by the enemy. Protect these buildings.
Trophies?
Trophies are how the game measures skill. Beating an opponent earns you Trophies (and causes them to loseTrophies). If someone attacks you and fails, they lose some Trophies and you gain some.
More Trophies are earned if you defeat an enemy that has more Trophies than you. More are lost if you lose to someone with less Trophies than you.
Gems?
Gems are the premium currency in the game. You can use them to buy extra Builder's Huts, buy a shield (1 day, 2 day, 7 day), buy Resources, boost Gold Mines and Elixir Collectors, instantly train Troops, boost training rate for Troops, or spend them on Decorations (very pointless).
Of all of the above, only Builder's Huts add a permanent benefit to your base. All of the other boosts or instant-completes run out after a few hours. Typically, players attempt to save Gems in order to earn a 3rd (and eventually, possibly, 4th) Builder's Hut.
Resources? (Gold, Elixir)
Gold and Elixir are the two resources in the game.
Gold is used for buying, building, and upgrading Elixir Collectors, Elixir Storage, Defensive Buildings,Walls, Traps, the Town Hall, and the Clan Castle. It is generally considered more valuable by players as you can instantly spend it on your walls in basically unlimited amounts (maxing your walls costs a grand total of 2,205,300,000 or 2.2 BILLION gold). Gold can also be used to buy Spells once the spell factory is complete.
Elixir is used for buying, building, and upgrading Gold Mines, Gold Storage, Army Camps, Barracks,Laboratory and Spell Factory. It is also used for training Troops and researching upgrades in the laboratory.
Shield?
Shields prevent you from being attacked. You get a free shield every time you are damaged to a significant degree (12 hour for being 40% damaged and/or losing your Town Hall, 16 hour for being 90%damaged)
You can also buy 1 day, 2 day, and 7 day shields with Gems.
How do I control my units?
You can't. You don't control your units at all once they are placed. Place them near the target you want them to go for.
Each unit also has a 'favorite target' they will ONLY attack until all of those targets are dead, then they will attack anything (see the 'i' info button in the barracks for each unit's favorite target as well as extra info).
Units will generally attack the nearest target of their choice. Ranged units and walls slightly complicate this.
A much more detailed explanation of unit AI and path-finding as well as unit strengths can be found in Unit Strengths, AI, and Pathfinding
Why don't I get my units back after a battle?
To keep the game balanced.
Imagine if you got back your super amazing, awesomely deadly, crazily expensive army if it survived the battle. You would be able to attack and attack and attack... all day. And that means someone else could do it to you, too.
It also means you should only place as many units as you need to defeat the current base as to not waste any units (and therefore time and Resources).
OK, I screwed up. Can I reset?
Yes, but it is not easy.
I also don't recommend restarting, even if you broke every one of the things listed above. To reset do this: (Previous version was patched in the February Update. This should work but is even harder.)
1. Delete your Clash of Clans program and all of its data (including Game Center data)
2. Get another compatible device (e.g. iPod/iPad) that has never had Clash of Clans installed on it.
3. Create a new Game Centre account on that device, and download and install Clash of Clans.
4. Play through the tutorial on your second device and name your new village.
5. Log into your new Game Centre account on your original device and reinstall Clash of Clans
6. When you start the game up you will be prompted to load the village you made on your alternate device.
You can also play your village on several devices at the same time. Simply log in with your same Game Centre Account on the new device and launch Clash Of Clans.
Holes in bases are bad, mmk?
When you move any building or wall (but not decorations), it shows you white lines one space larger in every direction from that building. This is showing you where enemies can spawn. Make sure you don't have any holes in your base to let them spawn inside your walls. That would be bad. I will write about how to leave intentional spawn spots in your base later, in the advanced base defense chapter.
Overlapping Defenses
Another common mistake: placing all of your defenses widely spread apart, to cover as many buildings as possible. Dies very easily to several giants. Or to groups of infantry, especially archers. Or to balloons. Which I guess means it just dies to everything.
This often goes along with trying to stuff everything inside your walls, covered later.
Splash Damage: It's your friend!
Mortars (and later Wizard Towers) are your first and last line of defense against mass infantry attacks. A mortar's damage is only limited by how many troops your enemy puts down and how well you funnel them into where you want them. A fully upgraded mortar (level 7, total cost 6,952,000 gold) will do 55 damage in one shot to the units within the splash zone. In the same amount of time (5 seconds) an Archer Tower (level 1, total cost 1,000 gold) will do 55 damage to the unit it is targeting. What does this mean? It means you need to make sure your splash damage defenses are hitting enemies in groups and are protected. How do you get them to hit enemies in groups? Put them in the middle of your base - As soon as the enemy destroys a wall and funnels through it, they will be nice and bunched up for the mortars.
Where should I place my Mortar?
Somewhere very protected. Probably in the middle of your base, ideally with its own wall around it for the mortar is unable to attack at close range.
Where should I place my Air Defense?
In the middle of your base. Mass air attacks are rare (due to time to train), but not unheard of. A single, upgraded Air Defense is a wonderful deterrent, but it should be placed in the middle of your base. More specifically, it should be placed such that, if a mass balloon attack comes, It won't be the first, second, or third defense they kill.
Don't try to stuff everything inside your walls
As a counterpoint to Overlapping Defenses, don't try to enclose everything within your walls. First off you will often break Overlapping Defenses and Defend your Defenses by trying to cover everything, but secondly it is just a waste of walls. Double thick walls are better than a massive single thick wall.
What should I keep outside my walls?
Absolutely keep your Builder's Huts, Laboratory,Barracks, Army Camps and Spell Factory outside your walls. None of these matter if they get destroyed - no progress or resources are lost. Next, I would keep out Gold Mines and Elixir Collectors. Each of these has some consequence if they get attacked: Mines and Collectors can have resources stolen (but only uncollected resources). Some people really like keeping Mines/Collectors inside - It depends on how often you play. If you do keep any inside, make sure they are your highest-level units.
What does that leave? Town Hall, defenses, Elixir Storage, Gold Storage. All of these should be inside your walls, and as well-protected as possible. If you are at a stage in the game where you don't care about trophies, you can also kick your Town Hall outside the walls. You will be easy to defeat, but if you're only trying to protect your resources, the Town Hall takes up a lot of space.
Is making the base square or rectangle hard for other players?
No, it's not. I personally find bases with square or rectangle bases easy to destroy, because there aren't any extra walls that are going to be the obstacles in my way. One or two wall breaker can easily breach through. If you have extra walls, use them for making it more difficult for players. You should put your base into a maze or with lots of layers. Wall breakers will also go for walls that are connected with at least three other walls. This means placing walls that stick out of the perimeter will be focused first.
Upgrading multiple defenses at the same time
Your defenses don’t attack if they’re in the middle of being upgraded when you’re attacked! Try not to be upgrading 40% of your defenses at the same time. This is doubly true for splash damage buildings (mortar, wizard tower ) and air defense .
Having a glaring flaw in your base
Such as a spawn point where you moved a turret out of but didn’t put anything back. Or not having an air defense turret. Or putting your air defense turret outside of your walls.
Buildings outside walls are too spread out
At higher levels, more players start caring about trophies. If an attacker sees your base is easy to 1-star (kill 50% of the buildings) without having to place too many troops they will see you as a good target. Keep your buildings close to your walls (and defenses) to prevent this, if you care about maintaining your trophy count.
Turret Range Considerations
What can your towers defend? One of the goals of placing less valuable buildings outside of your walls is to slow down your attackers once they are within range of your defenses. NOT to make them spawn farther back - This is of secondary priority. This section covers what that range actually means. Range in this game is also sorta screwed up - Sometimes a turret will decide it can attack a unit standing in a given square, but on another base (with identical unit and turret placement) it won’t attack.
Spawn Forcing
Spawn forcing refer to forcing your opponent to spawn further away from your important buildings, or your base in general. The objective is to attempt to persuade your opponent to attack from a different side of your base and to delay their reaction time (placing reinforcements). You can create this gap outside of your base by arranging your exterior buildings, placing extra walls, placing decorations and utilizing natural decorations. Note:This no longer works, as players can now spawn directly on top of obstacles and decorations. It is not recommended to use buildings to force your opponent to spawn further away, as buildings are more useful to delay your opponent once they are in range of your turrets. However, if you spread out your walls in singles (optimal distribution to create a large no-spawn-zone) wall breakers will never attack them. Spawn forcing allows your defenses to kill many wall breakers before they get to your walls if they are unsupported. For other wall breaker defense tips, see decoy walls below. If allowed to spawn directly next to your wall, wall breakers are able to detonate before turrets can strike, even if the wall breaker would normally be one hit by the turret.
Trick Spawns
Trick spawns are ‘mistakes’ in a spawn forcing situation. Usually a single hole, they are closer to the center of your base than the rest of the spawn force allows. However, they are intentional and you should make sure you have turrets (especially mortars ) barely within range of the spawn square in question.
Why use trick spawns?
Spawn tricks are fun (I’ve had an opponent put down 31 archers in a trick spawn just to have them all die to a single mortar hit - they didn’t opt to continue attacking). Normally they don’t matter but occasionally they help. If created without care, they can allow your opponent an advantage (such as if they can deploy wall breakers). It is inadvisable to rely on traps to defend a trick spawn - if you get attacked twice in a row they won’t be there the second time, plus a smart attacker will place a single unit in the square in question to test for traps.
Messing with Wall Breakers
Wall breakers are often used in conjunction with giants to get them through the outer walls faster. Here are a few tips to mess with the Wall Breaker AI.
Forthcoming Update!
Improved Wall Breaker training techniques have revolutionized the cunning of these fearless demolitionists. Wall Breakers now maximize the potential of each and every bomb, avoiding decoys and distractions.
Decoy Walls
Decoy walls are segments of walls of at least 8 that wall breakers will target if they are closer than your real walls. They can also be used to funnel archers and barbarians into taking lots of splash damage from mortars and wizard towers. Segments of 7 or less don’t seem to work most of the time (seems to be partially based on spawn proximity). If you do further testing and discover any additional details, please report back (for science).
Using extra walls for Buffering
Visual of buffering If you have extra walls, you can also use them to protect your defenses from archers by extending the distance between you turret and the offensive units. They simply prevent archers from getting close enough to fire, however they do cut down on the number of buildings outside the wall your turret can protect so I generally only recommend this for situations where you: 1) DON'T want archers attacking from, 2) have walls to spare, and 3) don't have buildings which can defend your turret instead. This situation can be considered the advanced method of 'Defending your Defenses' (from Flammy's Base Defense Basics) but is generally not viable to lower level players due to the number of walls necessary.
Upgrading walls
Walls should be upgraded in the order that they get attacked, generally outside towards inside. I generally discourage placing walls right around your Town Hall in the center of your base - If the enemy gets that far you are dead anyway. This also explains why your best walls shouldn’t be in the center of your base. Rather, upgrade your critical junction walls first - walls that are shared between more than two pockets. (Read The Pocketed Base ; if you don’t get what I mean by pockets) as well as exterior corners (due to wall breakers). Lastly upgrade walls that are likely to be attacked by giants going after your defenses - namely the walls just outside of the defenses themselves. I am not saying you shouldn’t upgrade all of your walls, just that you should focus on them in this order.
Oh, and DO NOT upgrade your walls in a polka dot manner.
Placing Traps
Place traps where enemies will be funneled into them. Don’t spread them out randomly, that just wastes money. Don’t place them in a predictable pattern - If I am attacking a base and hit two traps close to one another, I will deploy a few singleton troops where I would expect further traps to be just to clear them out. Do you really want to waste 4 bombs in a row on one barbarian? Or a spring trap on a single archer because you placed them evenly on one side of your base?
Don’t place your traps in an ‘entrance’ gap in your walls like the image to the right. Even worse is an entrance hall - It is blindly obvious thing to do and a single goblin running down your entrance hall will trigger every bomb and spring trap and escape unharmed. Then you've just spent several thousand gold for no real reward.
Clan Castle Placement
Clan Castle reinforcement troops will be deployed once the enemy enters the Clan Castle’s range. The troops will then jump and fly out over the walls to attack the enemy. The Clan Castle troops will target whoever activated them first, even if other units are closer on their way after their target. This section is rather long as many people don't use the Clan Castle properly. The Clan Castle can be most effectively used with a Standard Base or a Bulkhead Base using the following method:
The best use of your reinforcements is to delay your enemy while your defensive structures attack them. Because both the reinforcements and the attacking troops will only target one unit (50 enemy archers will all target the first reinforcement archer, all fire on her, leaving the other 9 units unhurt). This means your 10 (or more!) reinforcements can delay enemies for a very long time while they are slowly targeted down one by one. When used in this manner the level of the troops doesn’t matter, as once they are targeted they are usually hit by 50 arrows which is enough to kill both a level 1 archer and a level 5 archer. When used this way, this also means having 5 archers or 5 barbariansis much better than having 1 giant. While the giant has more health, it takes less volleys to kill than 5 individual archers, effectively delaying the enemy for less time despite its higher health. This makes the positioning of your clan castle especially important. Note bulkhead bases may want to leave a hole (http://i.imgur.com/AiCcC.png) for the reinforcements to move though, depending on design. If you leave a hole like this, try to also leave a spring trap in it! The only thing you shouldn’t do for sure is place your clan castle in a partition by itself.
Finally, you should be aware that reinforcement troops can be killed by your own spring traps if the enemy triggers them while the reinforcements are standing on them. So don’t place spring traps around your Clan Castle, especially if it is outside of the walls. The same is NOT true for bombs and giant bombs.
Tips and Tricks for Base Defense
§ Place turrets under construction in places that Giants might notice them and get distracted attacking (Like just outside your walls in range of your active defenses ).
§ Enemies can’t spawn on Decorations, or natural elements (trees, bushes, rocks), or on top of hidden teslacoils, despite the area under them showing as ‘spawnable’ (in the case of Teslas, this can be rather confusing as there appears to be nothing there. Once the Tesla is destroyed, the area under it becomes free and units can be spawned on it! But don't worry too much, hidden Tesla's cannot be taken out by spells as long as they are hidden). Now with the new updates enemies can spawn freely on Hidden Teslas and Decorations.
§ Hide a building in the corner of the map to possibly save yourself from getting 3 starred if the attacker is running out of time. Placing more than 2 is probably overkill, but you could place one in each corner if you really really care about it.
§ Enemies can walk across decorations and natural elements - Don’t use them as part of your wall!
§ Goblins can trigger bombs and spring traps and escape unharmed, because of their speed.
§ Be sure to request troops and keep your clan castle full, the troops will be deployed in case of an attack.
§ Review bases for others around your level by “visiting” them - If you like a design, steal it! Viewing allies in yourclan will show you their trap locations as well.
§ Reinforcements from the Clan Castle can die from allied spring traps if they are in the wrong place when the trap happens to be triggered. :(
Raiding IS Farming
I consider the type of raiding I will be describing here to be a form of farming. Not all will agree with me on this point. Some people seem to believe that farming requires super-low trophy counts, and/or using massed goblin armies, exclusively.
I consider anything that is mostly intended to gain resources (rather than to win trophies) to be a form of farming - especially when you are looking for an easy match, rather than fighting someone of your own level or higher.
What does this matter? Well, this is also going to be my "Farming" guide as well. I really don't enjoy doing those other types of farming (the massed goblins, or the super-low trophy count). So don't look for any other farming guide out of me, unless the game changes in ways that significantly change existing methods, or create entirely new farming techniques.
Benefits of Raiding
Raiding has one main goal, and all I will discuss in this chapter is in that effort: to capture resources. We’ll discuss going after both Gold and Elixir in this guide, as they are nearly identical when trying to steal them. Generally gold is more valuable to players, as it is easier to spend (instantly on walls, or on defenses) than elixir (limited to offensive buildings and units).
Raiding lets you augment your income with quite literally limitless resources. The amount of gold and elixir that is available for you to steal is limited only by your skill, and your time investment. But just note that you lose about 20 trophies every time you fail to get the town hall.
The Ideal Raid
The ideal raid deploys as few troops as possible, and targets whatever resources that are easy to steal only, skipping better-protected storages or mines.
The ideal raid has two main success factors. First, and what I’m sure you already know, is the amount you can steal. That is what we’re here for, after all. Secondly, and just as important but often overlooked, is your investment to get those resources. This means both the actual cost of the units you deploy when raiding, and also the time it will take you to rebuild all of them.
Don’t believe that unit costs and build time matter?
Take these two raids as examples:
Example Raid 1
Example Raid 2
Gold Stolen
100,000
15,000
Elixir Stolen
100,000
15,000
Goblins deployed
20
2
Archers deployed
46
2
Barbarians deployed
20
-
Giants deployed
18
-
Healers Deployed
1
-
Wall Breakers Deployed
4
-
Notes
An example of an all-out attack, using one of my favorite army compositions.
An example of picking off just 1 full elixir collector and 1 gold mine, and ignoring the rest because they are protected.
Both are nice raids, right? Now…
Which attack was more effective as a raid?
Example 1’s army costs around 55,000 elixir (depending on exact unit levels), while Example 2’s army costs a maximum of 600 elixir. This means the net total profit (gold + elixir) was ~145,000 for Example 1 and ~29,400 for Example 2. Clearly, Example 1 gains more total resources… However:
Example 1’s army takes a total of 5990 seconds to train, or 1.3 hours total*. Example 2 army takes a total of only 110 seconds to train. This means that while the player who used Example 1 is sitting around waiting for their army to finish, a player using Example 2 will be out raiding again, and again, and... This does not just mean a player doing Example 2 is less bored, it means Example 2 will actually have a much higher income per hour.
§ Note: This is the total time to build; the actual elapsed time to build this army is that number divided by the number of available barracks, likely either 3 or 4.
I’ll prove that for you:
Assuming 3 minutes to find a match (for both players), Example 1 will attack once every 28 minutes. During the same 28 minute period, Example 2 can attack 9 times, gaining a total of 264,600, compared to the 145,000 stolen by Example 1. Example 1 gains 310,000 resources per hour, and Example 2 gains 567,000 resources per hour.
While I used made-up numbers for this example, this has been proven before by both myself and other players. Lots of little raids will be more profitable than a few large, all-out attacks. There is another factor at play as well: Little raids are less vulnerable to failure: your total investment is low, and you can just abandon the attack with little loss if needed. Finally, doing lots of little attacks is simply more interesting than sitting around for 25 or more minutes waiting for your army to finish training.
Picking the right Base to Raid
So, now that we know what the ideal raid is, how should we pick the bases we will be attacking? There are several factors that are important
Quickly reviewing a target
Here, in order, are a list of things you should quickly glance at when determining if a base is a good choice to raid.
Resources - Total
The first thing you should glance at is the total number of resources. If this number is terribly low, (<10,000 of each is a good cutoff probably, but it depends on your level and your situation) just immediately move onto the next match. But don’t just look for very high resource totals… because the difficulty of stealing the resources is also very important.
Resources - Determining Source: Storage vs Collectors/Mines
If a base's total resources are sufficiently high, the next thing to determine is where the resources are in the base. They will be in either the storages or the collectors/mines, but different bases will have different ratios in each. The skill of being able to tell how much is in each is quite important, and will be VERY beneficial to those who master it.
First thing to look for is back at the total resources: Are the total amounts of each resource nice round numbers? (such as 50,000 or 36,500 or 42,750 – These are all ‘round’ numbers.) If yes, this is great news! This is someone who has not logged in for a long time, their collectors and mines are full, AND they have nothing in their storages. This occurs after they've been attacked and 3-starred at least once (often more) in the recent past. Why is this important? It means you can simply raid their collectors/mines to steal 100% of their resources. Literally nothing will be in their (usually far-better protected) storages. You can simply raid their collectors, and walk away happy.
Determining if target has been online lately (and collected their resources)
Is the total amount not a nice round number? Dang, well then... is one of the numbers particularly low? (such as 57,028 gold, and only 3,102 elixir.) This means that they have recently been online, and spent almost all of that resource; so, there will not be much in the collectors/mines (because they were online recently to collect them), so look at how hard the storages are to get to (for the other resource, the high one)
Examples of Single-Low-Resource bases
Example
Gold
Elixir
Example 1
57,028
3,102
Example 2
7,001
152,515
Example 3
1,234
40,808
Last Resort Method: Eyeballing
Not a nice round number, and both numbers are sufficiently high in count? Well, now we need to eyeball how much is in those collectors/mines. Look at the collectors. There is a graphical representation that shows how full it is.
Missing Resources Graphical Glitch
The missing resources graphical glitch is, as my name for it implies, a glitch where a 100% full elixir collector or gold mine can appear as empty. Often when the glitch occurs, well more than half of the collectors will appear as empty. Sometimes all will appear as empty. When attacked, however, it will reward the correct amount of the resource, along with the accompanying animation which shows lots of elixir bubbles/gold coins pouring out.
You can detect this glitch quite easily once you've trained yourself to look for it. If there is one collector or mine that is full, and then several that are empty right next to it (and they're all the same or nearly the same level) it is quite easy to tell that the graphical glitch is occurring. A very easy way to detect this glitch is if it is accompanied by the 'Nice Round Numbers' indicator discussed above. You can also look at the storage and if they appear in the 'empty or nearly empty' graphical representation, and yet there is a TON of resources available to be stolen, the resources are likely to be in the collectors and mines yet invisible due to this glitch. Alternative (and harder) ways to detect it include looking for signs of abandonment, such as lots of uncollected tombstones.
Should I attack or not?
Finally, once you've figured out how many resources there are, and where they are in the base, you need to make the decision to attack or not. In the end, it is up to you to determine if the Risk vs Reward makes a base worth attacking, or if you should keep looking for another base.
Risk Factors
Reward Factors
How many troops will you have to deploy?
How many resources are available in total?
Chance they have clan castle troops?*
How many resources are easy to steal?
If they do have CC troops, are they in a good spot? Or can you draw them out easily?
Are there collectors you can pick off for free? How much is in them?
Chance of hidden Teslas? (TH7 and above)
Exposed or semi-exposed storage(s)?
§ Look for tombstones indicating clan castle troops may have already been killed in a prior attack.
Use all of the above steps to determine the risk/benefit of attacking a particular base. You can ‘scan’ the base in 10 to 30 seconds quite easily. Are you getting close to the end of the 30 seconds? Just let the 30 seconds run out! If you don’t deploy troops, you can still click “End Battle” without taking a loss. Use the extra time to determine if you actually want to attack the base or not. Remember, once you deploy troops, you can't 'Undo'!
Common Army Compositions for Raiding
Good Army Compositions:
The Picker
3-14 Let's Play Clash of Clans - Getting to 1 Million... Maybe? (Gameplay Commentary)(09:06)
7,542 views
Great example of The Picker: Don't deploy more than you have to!
4 Wall Breakers, 2 Giants (optional) and the rest: 25% Goblin, 25% Barbarian, 50% Archer
How to use: Use Archers to pick off exposed buildings. Learn ranges on turrets to make this more effective. Use Barbarians to soak up turret fire, and Goblins to steal resources that can't be picked. If you opt to use Giants, use them to distract defenses. Otherwise, just use Barbarians.
The Poker
3-1 Let's Play Clash of Clans - Town Hall 6! Raiding for Upgrades (Gameplay Commentary)(08:55)
3,375 views
The Poker in action: It can poke, or it can pick! 4 Wall Breakers, 50% Giant, 25% Archer, 12% Goblin, 12% Barbarian
How to use: Slower and more expensive than The Picker, but more able to attack strong bases to get at resources. Giants can overwhelm (or at least distract) defenses depending on if you're attacking someone of equal level or lower level. Use the Archers to pick, as in The Picker, and Goblins and Barbarians to rush in and get storages. Wall Breakers are more important in this army composition than in The Picker, as they will seriously help Giants reach the defensive weapons faster. Don't deploy all, or even any, of the Giants if it isn't needed! Remember the 'Ideal Raid'!
The Striker
(For those with Healers unlocked only) (upgraded Poker army)
4 Wall Breakers, 1 Healer, 40% Giant, 25% Archer, 12% Goblin, 12% Barbarian
How to use: The Striker has lots of attacking power against all bases except super well defended Air Defense Turrets. Just like with The Poker, don't deploy your Giants or Healer unless needed to get at protected storages that you've determined are holding enough resources to make it worth it. Slow to train and replace, the Striker lets you choose if you want to deploy 40 Archers to raid the exterior of a base, or deploy a massive Giant force to three-star your victim ... IF they have the resources to justify such an expensive attack.
3-17 Let's Play Clash of Clans - Healer is... AWESOME (Gameplay commentary)(16:08)
3,022 viewsThe Striker Army Composition: Lower Level (TH6)
Clash of Clans - Raiding Giants with Healer, Rage spell! 1600 Trophies(04:37)
3,157 viewsThe Striker: Higher level attack (goal: elixir)
Bad Army Compositions:
The Rusher
10 Wall Breakers + 100% Goblins. Look for high resources, then deploy all Goblins. No brains required; not very detail-oriented. Why is this a bad raiding army? Well, it will get the job done: unless you run into a bad case of Wizard Tower, you'll probably capture all, or nearly all, of the available resources. The problem with this army composition is it basically relies on deploying mass amounts of units, which slows down your training time when you must replace them all, which in turn lowers your income. The three previous armies all give you lots of options to handle various different situations - they won't force you into all-or-nothing deployments.
Raiding Tips and Tricks
Train your army while you attack for more frequent raiding
Queue up additional soldiers before you go searching for a match! They will start completing as soon as you deploy your first unit in battle, so you will return to an already half-built army. Decreases your waiting time between raids.
Test for Clan Castle troops
The first unit you put down when raiding a base should be to check if they have clan castle troops. You don't want to be surprised when your plan goes wrong due to a bunch of enemies pouring out to distract your oh-so-carefully-placed-archers, drawing them into the line of fire of the defenses.
Trophy range considerations
Keep an eye on your trophy count! Different levels of bases should raid at different trophy ranges. These ranges also change over time, so what worked two weeks ago might not still work today.
Maximum Resources Available to be Stolen and Maximum Stealable from different sources
You can't steal all of an opponent's resources. The maximum amount offered to you when you view a base is actually comprised of some resources from the storage units (if any), some resources from the collectors, and some resources from the Town Hall (if any).The breakdown is like this:
Building
Amount you can steal of actual maximum
Capped at a maximum amount?
Town Hall
100%
No
Storage
25%
Yes, 198,000 of each resource
Collectors/Mines
50%
No
Dark Elixir Storage
5%
No
Dark Elixir Drill
75%
No
Resource Penalty for attacking lower level Town Halls
There is a penalty for attacking bases that are lower level than you in Town Hall level. This is to prevent higher levels from farming others who are significantly lower level than themself.
When attacking someone ___ TH levels lower than yourself...
... there is a ___ penalty applied to the maximum number of resources you can steal.
Meaning you can only steal ___ of total amount
1
10%
90%
2
50%
50%
3 or more
75%
25%
Single Player Campaigns are battles against NPC Goblins and their preset villages. There are currently 50 Single Player levels, and each level has 3 stars that can be achieved for a maximum possible 150 stars from all levels. Achieving all 150 stars satisfies the "Get those Goblins!" achievement worth a total of 35 Gems. Each level also has varying Gold and Elixir rewards that can be raided from storages and Town Halls. The basic mechanics in the Single Player Campaign are the same as in multiplayer, with the following exceptions:
§ No player Trophies are won or lost.
§ There is no time limit.
§ The number of Traps are unlimited.
§ Attacking (in the Single Player Campaign) will not remove an active Shield.
Most people attack while they have a shield and nothing else to upgrade to give them something to do.
Doing the campaign is very well worth it, as the last raid is worth 800,000 Elixir and 800,000 Gold. Furthermore you get Gems for three-starring every map.
A number of the levels have no Air Defenses, Archer Towers or Wizard Towers. That means you can easily complete them with a singleBalloon (or Minion). Be aware that other missions can still be won with 1 Balloon as well; you just have to destroy all the Wizard Towers, Air Defenses and Archer Towers with other troops/spells first.
§ A note of caution when deploying a single Balloon to destroy entire bases in this fashion: while there is no time limit, the game itself can still time out due to inactivity and cause your attack to fail (regardless of how many stars you had earned to that point). To avoid this simply zoom or pan the screen periodically.
Below is a list of all Single Player missions and their rewards, along with brief strategies for completing them:
The Target
It is good to have a target in mind when going raiding. There are a few reasons to attack:
Farming
§ Gold: the resource needed to upgrade Defensive Buildings (excluding Seeking Air Mines), Elixir Resource Buildings and buy Spells. Also needed to allow the player to be matched to potential foes in multiplayer battles.
§ Elixir: the resource needed to upgrade Army Buildings, Gold Resource Buildings and train or upgrade Troops.
§ Dark Elixir: the resource needed to buy Seeking Air Mines and train or upgrade Dark Elixir Troops andHeroes.
§ Trophies: an award upon a victorious attack or defense. Click the links for more info.
Other Attacking Reasons
§ A mix of above farming goals.
§ Testing new army composition.
§ Lower Trophy count (usually done by spawning a single troop to intentionally lose a battle and Trophies).
§ For Fun!
Before Attacking
§ Remember that it takes Gold to search for an enemy, but Revenge is free. You can even visit the base to plan your strategy beforehand.
§ Every time your Town Hall levels up, the Gold to search for an enemy increases.
§ Have a goal in mind. Example: "I will attack if the enemy has >100,000 of either resource."
Gold Raids
Preparation
The first thing I think of when I think of a Gold raid is...well, I think of 2 things:
1. A huge Elixir-spending raid, for instance a couple ofDragons, with some Giants, and maybe Barbarians andArchers.
2. An easy all-out Goblin raid.
Of the two, the one that will bring in the most Gold is theDragon composition, but it will also use an enormous amount of elixir. However, since this is a 'Gold' raid, we typically do not care about how much Elixir we spend in this kind of raid. I will demonstrate to you what I myself usually use when going for Gold (which happens to be 90% of the time).
Army Composition
Army Cost
Army Space
2 Dragons(level 2)
60,000
40
20 Barbarians( level 5)
2,000
20
10 Giants (level 5)
25,000
50
6 Wall Breakers (level 5)
18,000
12
78 Archers(level 5)
15,600
78
Totals
120,600
200
As you can see, the army is powerful, but extremely expensive. I am currently using this army composition for Gold+Trophy gain. With it I am capable of getting up to 250,000 of each resource.
Execution
The first thing I do is check for Clan Castle troops with 1 Barbarian. If so, then I draw them all out and to the corner of the base with Barbarians, after which I am usually left with about 10-15 Barbarians remaining. I then place them all on top of the Clan Castle troops, which are usually Archers, and Archers die quite fast with a Barbarian swarm on them.
I then place my Giants at 1 Air Defense with a couple Wall Breakers. I follow that with the Barbarian King (if you have him) and my remaining Barbarians near the other Air Defense, along with Archers to take it out. Afterwards, I place the Dragons, usually so they go straight in to kill the middle part, filled with tons of storages that the rest of my army just couldn't access. I then place the rest of the Archers around the base to come in and help out. It is a complicated strategy, but it keeps me gaining Trophies (slowly but surely), and tons of Gold.
Inexpensive Alternative
For those of you who are not interested in gaining Trophies and Gold at the same time, or that just simply need the Elixir or don't have Dragons yet, I recommend this composition:
Army Composition
Army Cost
Army Space
5 Wall Breakers (level 5)
15,000
10
100 Archers(level 5)
20,000
100
90 Goblins(level 5)
9,000
90
Totals
44,000
200
Now on this army composition, it is much cheaper, and you do not have to deploy everything for the army to be effective, like the Dragon strategy. You can just place 5 Archers to pick off some unprotected Gold Mines and Elixir Collectors and then leave with...let's say 25,000 Gold and Elixir. You definitely made a lot of profit, and you will be able to attack again in less than a minute. You will rarely have to use all of your army to get what you want, and you will be able to attack very frequently. The Wall Breakers are there as sort of a last resort to where you need to get some walls broken to get to the middle and take a ton of resources. This is a great choice for those of you who don't mind losing 20-30 Trophies to get 20-30 thousand resources essentially for free, and for those of you also saving Elixir.
Elixir Raids
Preparation
While Gold Raids allows you to spend elixir like it is going out of style, Elixir Raids are more tricky: You must design an army that is effective yet inexpensive. You must also decide how many of which troop type you will use. Remember that there is no rule that says you have to use all of your troops, so you can afford to make some special troops like, for example, Healers or some extra Wall Breakers. Here is my setup:
Army Composition
Army Cost
Army Space
55Barbarians(Level 5)
5,500
55
84 Archers(level 5)
16,800
84
45 Goblins(Level 4)
3,600
45
8 Wall Breakers(Level 4)
20,000
16
Totals
45,000
200
Obviously, the most expensive troop—especially in a group—is the Wall Breaker. However, I believe it is good to have some extra! You do not have to use all of your troops; this is an important concept when farming Elixir. TheBarbarians serve as replacement meat shields for Giants and in numbers can be quite devastating. Even so, they are not as hardy as Giants and a few Mortar shots can quickly take out your army. Goblins are essential not only for their expertise in raiding resources (as opposed to defeating bases for Trophies), but also because they are inexpensive.
Execution
Whatever army you decide will be both cost-effective and able to get the job done, you will need to hone your tactical skills to use the Tier 1 Troops. Here are some tips and essential concepts:
1. Looks for how much Elixir is available. The amount must exceed your total army cost!!!
2. Look for easily accessible Elixir.
3. Make sure you know where the Elixir is, i.e. in storages or collectors. Remember that upgrading collectors are empty collectors!
4. Check for defenses that are either under construction or can be destroyed easily.
5. Whatever troops you don't have to use is proverbial money in your pocket!!
There is some good news. While collecting Elixir, you can use all the Gold you like! So pull out those Spells and throw down some Avada Kadavra! 2-3 Lightning Spells can be used to take out one or more defenses. A singleRage or Healing Spell can turn the tide or be used together for devastating effect.
Dark Elixir Raids
Very much the same as a normal Elixir raid but with less targets. In fact, there is only one storage container to attack. However, Dark Elixir Storages are usually well-guarded, so be prepared to punch through some major defenses. Also, do not overlook the Dark Elixir Drills which may contain a reasonable amount of DE (Dark Elixir). In the spirit of the other resource raiding strategies, it is advised that you do not use Dark Elixir Troops to raid for DE. It is hard to come by and if your raid is unsuccessful, you might end up spending a lot of time earning back the DE you spent on your troops.
Trophy Raids
Use whatever means necessary to win 3 stars and obtain the maximum amount of Trophies. The strategies are endless, and in the end many players will agree it's fun to figure out your own unique strategy. There are many different experience levels so we will simply put up army composition for low to mid level players and high level players.
Low/Mid Level
With level 3-4 troops, 160-180 spaces and as high as a Wizard (Tier 2), there are many army compositions for raiding. In the end, you will just have to see what works best for you. For instance, some players have met with great success using a Balloon raid tactic:
Army Composition
Army Cost
Army Space
32 Balloons (Level 4)
112,000
160
20 Archers (Level 4)
3,200
20
Total Cost: 115,200
Total Space: 180
2 Lightning Spells (Level 3)
36,000 Gold
This strategy is not for everyone, but it could be for you. Look through the Attack Strategies page for more raiding ideas.
Note: Goblins are not just good for Farming resources. Their expertise in looting gives them a x2 damage bonus to resource buildings. Goblins might destroy resource buildings while Giants distract and take out defenses to win a one-star 50% victory.
Creating The Perfect Base!
When you start Clash of Clans, a good base is not essential due to the lack of defenses, & awesome stuff when you start playing, but from Town Hall level 4 and above, you should start to think about protecting those precious Gold and Elixir from those evil raiders that are stealing from you nearly every time you log off. Okay, let's start of building our base!
Types of bases
There are many different bases out there. Many you will see being uploaded on YouTube to share with the world, or just a screenshot posted on the net. I'll explain the more common types of bases here:
Cornered base: This is a base that is in a corner, except that there are no walls at the back. Probably players who don't watch replays and don't know how to spawn troops outside the ring of the 40x40 square village. Easiest to destroy, pummel, and flat out win for you.
Packed base: This is a common base at lower levels- one of the easiest and probably the most enjoyable base to raid. One line of walls surrounds the base and is the only thing in the way from stopping the mass mob of monsters outside. Once one of the walls are broken, the raider has almost full control over the ongoing raid and if this happens- it should decide the fate of your Gold and Elixir. Bad base, altogether.
A TH6 pocketed base.
Split base: Also another common but poor base, two adjoining 'parts' of a base are either (A) separate from each other or (B) Connected like a packed base, but a wall in the middle. From previous experiences, they are almost funny to watch how they are decimated so easily. Yet another poor base, but at least better than a packed base.
Pocketed Base: High levels use it, so why shouldn't you? A variation to the packed baseWell, for one, it wouldn't be very effective unless your roughly Town Hall 6 and above. When I used it, it was quite- okay, extremely poor. Back then, it gave me 90% chances of losing a battle, (though that may be because of my high trophy count at that time) so I changed it. Great or not, that I can't say.
Spiral base: Now it starts to get interesting- spiral bases can be extremely effective if planned carefully, but if done lazily, may lead to disaster. Not common, but that all just leads to your advantage- if you choose to unleash it onto your Clash of Clans. Not much to say here but this is a start to an effective base.
Titanic base: Other known as Bulkhead base, it is like the Titanic's 'unsinkable' technique - when one section is breached, the other sections keep it afloat. The flaw was, the iceberg ripped two sections in a row, leaving the Titanic in ruins- and at the bottom of the ocean.
Anyway, let's call it the Bulkhead base. Bulkhead bases are usually a building surrounded by walls, except there are quite a few and are packed closely together. People who love symmetry most likely won't like the bulkhead base.
Update: Bulkhead bases will NOT prevent Wall Breakers from coming inside and blowing up those walls. Look at the article 'Dark Elixir and Artificial Intelligence'
Okay, we're done! Once you have chosen your favoured base, it time to kick out buildings (YAY)!
What buildings need to be kicked?
You should, I suggest, kick out your Spell Factory, Laboratory, Barracks, Army Camps and Builder's Huts outside. Gold Mines and Elixir Collectors should be outside, too, unless you aren't regularly online. Definitely keep your Gold, Elixir and Dark Elixir Storages inside.
What about your Town Hall? Read below for the pros and cons...
Pros
§ You get a completely free 12 hour shield when someone decides to attack your Town Hall.
§ Chances are that the attackers will target your Town Hall, and then leave you alone.
§ If you are farming, lower levels might attack your Town Hall. This offers an extremely important advantage for raiding (this also counts for non-farmers), you can view how much Gold, Elixir/Dark Elixir he or she has, check out the defences without the 30 second timing before attacking commences. Revenge Raids are, in my opinion, the best type of raid you can possibly get in Clash of Clans.
Cons
§ There is a much higher chance of you losing lots of trophies when you have your Town Hall outside.
§ If you farm, lower levels can attack your Town Hall (if it is a completely unprotected area) and get 1000 of both Gold and Elixir. This may seem a lot at the start, but it is in reality nothing compared to later on.
§ Trophies can get you into a better clan.
This is for you to decide. If you decide to put your Town Hall...
Outside
Then no need to worry. Just don't put it in a completely unprotected area.
Inside
This is slightly more difficult, as every base is unique in its own way. One thing to keep notice of is to put your Splash Damaging Buildings (Mortars and Wizard Towers) and to put surrounding walls around it. Unfortunately, it will not work for spiral bases. Another tip to consider is to put your Storages near your Splash Damaging Builders as well.
Now, messing with those raiders... Think they are crafty? Let's see, after this!
Messing With Raiders
You've always hated people raiding you, correct? Well, it's time to frustrate them for your enjoyment! (mwuhahahahaha...)
UPDATE: These tricks will no longer work. Check out the 'Dark Elixir and Artificial Intelligence' section.
Good Game Spawn Point: Lol, I just made that name on the spot. Spawn Point is when you make a "accident"- a mistake where there's a little spawn hole to put troops. This must be done carefully. If not, you, my sir, shall die. Jokes. Anyway, if you do it correctly, the troops there might A. activate a trap or B. get killed by the surrounding defenses around the spawn hole. Not suggested to use unless you are familiar with the game.
Forcing: Forcing is also a good old tactic. It's when you put decorations and waiting for obstacles to pop up where you want them, just to make your enemy spawn their deadly troops a little further. Good 'ol forcing.
EDIT: Since this will no longer work, I will show you a different type of 'forcing'. It is when you put walls, but leave an intentional gap to bring the enemy troops to go through it. There is usually a Spring Trap or Bomb, and both are effective at taking down large amount of troops. See more at Dokugan's Advanced Strategy Guide.
Funneling: Also an "accident", it is when there is a hole that varies from small to large to encourage the raider to spawn their troops where they want. Most likely if you see such thing, you'd expect traps. This is not always true. Sometimes, a funnel might mean the troops will attack the nearest building, and while it's distracted, get killed by the rain of death and destruction from the inner base. Very useful, even for lower levels.
EDIT: Found a person who uses trick spawns! He goes on to explain that 'I don't lose a cent'. This also involves the use of dropping troops onto Hidden Teslas, which became available after the update.
Whew, finished the first section! Feel free to edit my mistakes, grammar errors and typos. If there is any type of vandalism, please delete it and report to the Clash of Clans Wiki Community. Now that's cleared, ONTO THE NEXT SECTION!
Raiding
Now we've cleared how to discourage people from raiding you, allow me to give you tips on how TO raid people. I know... how evil!
Okay, to start off (just for the beginners. If you are familiar with this, please move to the next section). I shall show you a guide to the functions of raiding:
And now...here are four types of raiding! They are...
Multiplayer Raids: When you attack another player, but only if they are offline. You must pay a small fee each time you refresh to see another potential victim. As in the picture, the Town Hall level is 6 and so it costs 250 Gold. The cost doesn't matter as you will usually regain it after you raid someone.
When viewing a base in Multiplayer, it will also display the amount of Gold, Elixir and sometimes Dark Elixir. Trophies can also be viewed, and may vary from 0-30. One third of trophies can be earned by getting one star or destroying a Town Hall which rewards one star anyway. Two thirds of trophies is from 2 stars either from 75% or 50% and destroying the Town Hall. Full amount of trophies can earned from getting 100%, and only 100%. More info can be viewed in the section 'Trophies'.
Single Player Campaign: When you raid those Goblins who led the very first raid on you and you Town Hall level 1 base(Been a long way, haven't you?). Single Player Campaign doesn't give any significant loot until the more advanced levels, but still fun to raid when your shield is up. Nothing else to explain here other than the fact that no trophies can be gained through this.
Being raided._. Nothing you can do here. Just reminding you of the anger that swells up when you see the message "You have been raided by xXx YOLO xXx".
Revenge Raids: When you revenge someone who raided you (fortunately Supercell added this after the initial release). This is one of the best ways to raid someone as you can view their loot, scan their weak spots in their base, and if you think your not up to the challenge, copy their base if you share the Town Hall level! Recommended raiding out of all, most definitely.
Army Compositions
There are a limitless amount of army compositions. Now I don't want to get ahead of myself, so don't sweat- there is no composition here that says something like "5 PEKKAs and 100 Archers". Feel free to add good army compositions, but please be mindful of the lower levels who may not have even unlocked 'Wall Breaker'. Thanks!
My current army composition is as follows-
40% Giants, 3 Wall Breakers, 35% Archers and 25% Barbarians.
How to use: Deploy Giants to distract defences. Wall breakers are optional, as they are pretty pointless in the raid. Spread the of the base near the Giants with archers and barbarians to terminate the base. Near guarantee of 1 star or 2 star.
A example of a lower level composition is quite easy and basic-
100% Barbarians
How to use: Deploy all at once. quite effective, though there's no strategy involved.
A army composition that is usually used for farming of resources-
100% Goblins. I know.
How to use: Send all goblins to wipe out the resources and leave the base of nothing else. Usually.
Add more if you want!
The Perfect Raid
Admit it- we all want the perfect raid. But first, what is it?
Raid Stats
Raid One
Raid Two
Gold Stolen
100,000
10,000
Elixir Stolen
100,000
10,000
Giants
10
-
Archers
40
-
Barbarians
35
-
Goblins
0
2
You choose.
Well in my opinion, the 2 Goblin Raid is the 'ideal' type of raid I want. But here's the tricky question- If you keep doing this, wouldn't you lose so many trophies you won't be able to find such high amount of loot in one collector?
Not true. When you lose, you rarely lose a lot of trophies, so after you save up for that Town Hall upgrade you want, you can just rise back up quite easily- notably with the help of farmers with one-two goblin raids like you. Also it's been proven that Raid Two can steal, and manage to rake in more resources that Raid One. Of course, people still like to go all out, as I have done before.
Look for Poor Bases
A poor base usually does not follow the rules for a good and solid base. As mentioned in the first section, it is usually a packed base or a cornered base, but can sometimes be a bulkhead base too. This rarely matters, but can you see if the storages are well protected there? And if they look like they are brimming with Gold or Elixir? How about the loot number- is it nice and round, or uneven?
These are the questions you must answer when scanning for a base. If storages are too well protected, skip that base.If they don't look as if they have lots of loot, that means most of the loot is in the collectors. Very important, especially if they have a nice and round amount of resources. If its like this:
100,000 Gold and 1,000 Elixir, it means that the player has been on not to long ago.This also means most of the resources have been collected and put into the storages. Skip if they are.
If it's like this:
105,000 Gold and 90,000 go ahead, if your feeling confident. The factors are essential.
I sometimes raid higher levels, as in much higher levels because of the high amount of loot- as in, 200K of each. Very satisfying, as the loot is almost definitely in the collectors.
I hope you enjoy your perfect raid! (I hope I made sense!)
Additional Content: Logging on while being raided
A very frustrating message that rarely, but still happens, is logging on while being raided.
...And logging back on, thinking to yourself, "Now why didn't I log on just 3 seconds earlier?"
Trophies
Let's review the section above, shall we?
"...One third of trophies can be earned by getting one star or destroying a Town Hall which rewards one star anyway. Two thirds of trophies is from 2 stars either from 75% or 50% and destroying the Town Hall. Full amount of trophies can earned from getting 100%, and only 100%. More info can be viewed in the section 'Trophies'." More trophies can be potentially earned if your opponent is 'weaker' than you. Here comes the very difficult and unfair thing about Clash of Clans- farming, when higher levels drop their trophies intentionally so people at their trophy count can't raid them. Very efficient and very helpful, especially when you want to save up for a Town Hall upgrade."
People earn Trophies and people ditch trophies. Ditching trophies is, called farming. Very efficient to save up for a Town Hall upgrade. Let's look:
The leaderboard (Top 50, etc.) is determined by the cups. When you scroll down in the Top 50, you can see your name or clan and the amount of trophies your clan has or how much you have.
Anyway, you can either lose or win trophies by raiding people. If you win a raid, you win trophies and they lose trophies. Vice versa.
When you raid, you are matched with people about your trophy count. People can ditch trophies just to attack you.
Earning 1250 trophies, you can get the Sweet Victory achievement and get 450 Gems.
Since the most recent update, players now become a part of a Trophy League. Each League gives you a resource bonus at the end of a victory. See the Trophy Leagues page for more info.
This is a good idea, as people are abusing the system by farming. I'm not saying its a bad thing, but what I am saying is that there is a huge loophole in the entire system and the whole purpose of 'trophies'. I once tried lowering my trophy count to 300, and jumped straight back up with 215 trophies. This tactic can be used for getting the Unbreakable achievement, which is successfully defending against 250 attacks. Nice thing.
Down
Down
Down
Down<
Doooowwwn...
Clan
Okay- here we are, at the main purpose of the game- a Clan! I will show you all I know about Clans- earning loyalty, respect and honour and all that trash. Let's start from the start...
Your Clan Castle is needs to be rebuilt to join or create a Clan. If you haven't done that, rebuild it for 40,000 Gold. Anyway, lets assume that you have rebuilt your Clan Castle. First things first, join a clan...
Choosing a Clan
To do this, you must click on your Clan Castle and hit the 'Clan' option. It will show a list of clans that will range from either 11 to 44 people in each. You may be allowed to search for a clan, like your friend's clan.
Anyway, once you have chosen a clan, say Hi! Have a chat, request for troops, donate troops, everything a typical clan usually does. If there is no one talking in the clan, check the last message made. If it says something like 11 days 2 hours ago, or 12 hours ago when you usually sleep, then it's best to find another clan, as the people must live in a different time zone than you.
Donating Troops
When donating troops, you should donate archers as they are the best form of troops to donate and get donated. Why? Because archers are cheap, they can shoot over walls and people are just willing to donate them. You can only ask for troops every 20 minutes. Try to donate as many troops as possible as they give you 1 exp depending on the troop each time you donate, and people will like you more and maybe promote you to ELDER. Every troop you donate will also count for the Friend In Need achievement, which will reward you with GEMS!!
Where to put your Clan Castle, and how to defeat Clan Castle Troops
Defensive
Move it into a strategic place, like where most people attack you from because your Clan Castle has lot's of health and can absorb a lot of damage. Also, your donated troops (if any) will come out and attack the enemy, slowing them down and possibly, but unlikely, change the tides of the battle.
Offensive
Put down one archer or a weak troop to test if there are any troops inside. If there is, send a giant and about 5-10 Archers, depending how many troops are inside. At the unlikely chance of a strong unit coming out like P.E.K.K.As, just send in all your troops as it will overwhelm the Clan Castle Troop/s and defeat it.
Leader, Elder and Member Rights
Leader
Has complete control over the entire Clan. He (or she) can either change the message displayed on the Clan Info bar, change the flag, kick anyone out (including elder) and control who comes into the clan and who doesn't. Leader has the most powerful position in the entire Clan.
Elder
Has no rights except that they can promote members to elders, kick members and in Invite Only clans, accept who comes into the Clan. Leaders be warned, elder's should be chosen carefully.
Member
Zero rights. Nip, none and nada.
How many trophies count towards the total Clan Trophy Count?
Ranking of Member
% of trophies that count
to Clan Trophy Count
1-10
50%
11-20
25%
21-30
12%
31-40
10%
41-50
3%
Interesting, eh? Now you can see why the top clans aren't always full.
Clan Hoppers- find them, and destroy them.
Everyone hates Clan Hoppers. What's that? It's when some joins a clan, then leaves, usually causing a trail of destruction in its wake. What they do...
1. Become Elder, then kick everyone. Sometimes they manage to persuade the leader to give them leader, and it never ends well.
2. Someone who starts an argument, or spams the Clan Chat, usually with emty boxes or lot's of swearing.
3. Clan advertisers that come to the clan to try and persuade the people inside to join their clan. These people are hated in an extreme way.
4. Greedy troop taker- a hopper that asks for troops than leaves. Always resented, especially if clan members gave them a high level troop.
The only type of clan hopper that is welcomed friendly is probably the ones that are friends with the leaders in those clans, or when an extremely high level player or someone in the Top 50 joins. Not common, but there have been records of those that have.
My Clan
This is the list of all the Clans that I have been in. These are also the ones that I remember. So, in no particular order...
1. The All Stars
2. Archer Elite
3. Trinity
4. cnn
5. DarkShadow
6. Volcom
7. Chaotic Empire!
And yeah. This is for the people who are curious, that's all.
I an in Chaotic Empire! and staying, unless some unknown reason I leave. Yay!
Tips and Tricks
This is a list of useful game tips, so feel free to add more!
Click here for the original article.
1. Clan Castle Troops that survive a raid will return to your Clan Castle. If not, they come back as 20 Elixir.
2. The maximum amount of resources you can take during multiplayer battles are 50% of resources stored in the gold/elixir collectors, 75% of dark elixir stored in Dark Elixir Drills, 5% of dark elixir stored in the Dark Elixir Storage, 25% of Gold/Elixir Storage and 100% of what is stored in the Town Hall. However, if the opponent has a Town Hall which is 2 levels lower than yours the maximum available loot is reduced by 50%. 3 or more levels lower and it's a 75% reduction.
3. Multiplayer raiding is based on trophy count. Enemy levels will vary largely.
4. During a raid, you can end the battle even after the countdown has begun without penalty as long as you haven't deployed troops and the button does not say "Surrender".
5. Try to upgrade defensive buildings when you have a shield as they do not defend while upgrading.
6. You get a 12 hour shield if your Town Hall is destroyed, or 40%-89% of buildings are destroyed. 16 Hours if 90%+ is destroyed. (Yippee!)
7. You get 1 star for destroying an opponent's town hall. You get another star for 50% total damage. You get the third star for destroying everything.
8. A Dragon and Healer can fit in a level 3 Clan Castle, and a P.E.K.K.A can fit in a level 4 one.
9. Upgrading your gold mines or elixir collectors stops production, and they won't begin to collect until they are completed.
10. Defensive buildings are rated as damage per second rather than per shot, therefore slow firing. For example, the Mortar has high damage per shot and yet has a low damage per second.
11. Donating troops to Clan Members gives experience points, however the player level has no meaning.
12. You can't cancel troop upgrades in the Laboratory.
13. Army Camps, Clan Castles, Gold storage and Elixir storage can still be used while upgrading.
14. Players cannot raid your Village while you're online, though the game times out if not touched for over 5 minutes.
15. Bombs, spring traps, air mines and decorations can be built without the need of a free Builder, unlike building or upgrading walls and removing obstacles.
16. Wizard Tower is the only defensive building that does splash damage to air attacks.
17. Nobody can steal your Gems.
18. Barracks will produce troops while you're raiding an enemy village. Start production for your next battle before you begin a raid.
19. Start training troops when you log off. They will be ready for the next day even if your camps are destroyed.
20. You can safely hide up to 900k elixir by filling the training queue of your barracks with Wall Breakers, which has the highest elixir per unit slot of 3000 at level 5, when your Army Camps are full. Cancel the training to get the elixir back and then train troops you will actually attack with.
21. The amount of experience needed to go up a level is 50 for level 1. For example to go from level 10 to 11 requires 500xp.
22. Even if your troops you used in attack survive the battle, if you actually deployed them to the battlefield, then you will still need to replace them.
23. Upgrade all your towers and buildings to the max before upgrading your town hall.
Try to save up your gems to buy a Builder's Hut.
Dark Elixir and Artificial Intelligence
The 'Wall Breaker' update was pretty big, and had to cover it in one chapter. I will explain about Dark Elixir, Dark Barracks, Dark Elixir Troops, Wall Breakers, the latest Artificial Intelligence for troops and, additionally,exploiting Dark Barracks! Let's get started!
This chapter affects 'Messing with Raiders'.
Dark Elixir
Okay. Dark Elixir is a rare form of Elixir- namely Dark Elixir. You can buy a Dark Elixir Storage for 600,000 Elixir at Town Hall level 7, and a Dark Elixir Drill for 1,000,000 Elixir at Town Hall level 8. When you have 10,000 Dark Elixir (which can be bought with gems) you can buy a Barbarian King, and with 40,000 an Archer Queen.
Minions, which can be trained from Dark Elixir Barracks which cost 750,000 Elixir, cost 6 Dark Elixir each, Valkyrie for 100 Dark Elixir each and Hog Rider for 30. (Repeated below)
Best way to get those rare Dark Elixir? Rain Lightning Spells on it. Not effective, but do you really think you would be able to get any more with full force? Possibly, but unlikely for the well guarded ones.
Hog Rider Sneek Peek
Dark Barracks
Dark Barracks can train Dark Elixir Troops! Just like a regular barrack, troops cannot be trained while being upgraded (I know). What can they train? Read on!
Dark Elixir Troops
Can train...
1. Minions, which cost 6 Dark Elixir. They do 35 damage per second, and have 55 hitpoints. They are a flying unit.
2. Valkyrie for 100 Dark Elixir. The do 60 damage per second, and have 750 hitpoints, which is more than a Giant.
3. Hog Rider for 30 Dark Elixir. 50 damage per second, have 300 hitpoints. Can jump over walls.
4. Golem for 450 Dark Elixir. 38 damage per second, 350 splash damage upon death and will split into two smaller Golemites which continue to do damage. 4500 hitpoints, which is more than a Giant.
Wall Breakers and their new AI
Forthcoming update
Wall Breakers used to be fooled by spiking. But now, as you can see, Wall Breakers are now smarter than they look (or are they?) and need more elbow room, so they take up 2 spaces. This means that you can store half the elixir you could have stored before, using a trick that can be read in the 'Tips and Tricks' section.
So anyway, now our Wall Breakers are smarter, they will ignore spiking. Good thing or bad thing?
Pros:
When raiding, you can ignore any spikes. And, Wall Breakers are finally smart enough to blow up the inside walls, and not the outer walls, despite the old description for Wall Breakers...
Cons: You can't spike.
This stuff depends on how much you play. If you play a lot, than this update should be GOOD for you, and if you are less active, this update is a Clashers nightmare... Well, not much to write about there.
Dark Barracks' Ultimate Flaw
What is this flaw, you ask? It's the very fact that Dark Elixir can be stored. Instead of Wall Breakers, you can now have Minions being queued up! This trick works best when you are asleep. And now- how to do this neat little trick:
1. Have a full Army Camp
2. Go onto your Dark Barracks and queue as many Dark Elixir Troops as you can
3. Log on the next morning, or the next time you come back
4. Unqueue your Troops
5. Flip your table, as this is a terrible trick (╯°□°)╯︵ ┻━┻)
6. PUT IT BACK ಠ_ಠ
7. ┬─┬ノ( º _ ºノ)
8. Look at all the Dark Elixir flooding back in!
Gold, Elixir and GEMS!
We all love them. Who doesn't? Even outside Clash of Clans, people will do anything for money. Let's get out of topic for a while...
Why is money so valuable?
The reason, is quite simple. We grant it power. If no one granted it any value or worth, it would just be a very nice looking piece of paper. This is the same with many other stuff. Is a painting valuable? Maybe, if that person is famous. The more wanted something is, the more value it has the potential to have. This applies to Gems, Gold and Elixir. Supercell grants it power, especially to Gems, as you can be sure that they are the main purpose Supercell continues to develop the game.
This is an example of how your money comes out the other end with PRIZES!
Your money
↓
Gems
↓
Gold Builder's Huts Elixir
↓ ↓ ↓
Used to buy spells, traps, etc. Upgrading Used to buy troops, upgrades, etc.
Nice, right? Yeah. Supercell longs for your money, and look what happens- they rake in about $750,000 per day. Ironically, that's how much a Town Hall 6 upgrade costs.
How do I spend my Gems wisely?
Save up, and never use them. What to save up for? Builder's Huts. Your entire village is being relied on plump, round men that don't even have a proper living space. But what do they actually do? Hammer on a tree until it fades is one. Hammer on your Town Hall until it's will is broken to upgrade by the how-many-thousand-times it was hammered, or they simply make walls and traps appear without even lifting a finger.
Thinking of it, I'm gonna lodge a complain to Supercell about the common sense of builders. Naw, jokes.
Just remember never use your gems unless ABSOLUTELY necessary.
How do I spend my Gold wisely?
Defensive buildings are a number 1, as when people raid you, your defenses- along with any Clan Castle Troops or traps that have been placed- shall decide your fate of your resources. Sound familiar? I mentioned it in the first section. Then you can continue with whatever is important to you.
Free gems!
You can get them from Achievements. Read the section after Shields...
How do I spend my Elixir/Dark Elixir wisely?
That is less tricky. Spend it on Barracks, Army Camps, Laboratory, Troops, Altars, or anything I forgot to mention.
First section gone of Dokugan's Strategy Guide: Part 2! Ain't that quick...
Shields
This is an article that should have been added in the section 'Raiding' which can be viewed further up, in Dokugan's Strategy Guide.
Okay! What is a Shield? A shield is a barrier that protects you from attacks from other players. It can be broken when you raid, only not in the Single Player Campaign (Read below for more) which does not affect the shield in anyway.
Most effective way to use 'em?
Put your Town Hall outside. Why? Read below...
Town Hall= Free Shields
When you put your Town Hall outside,there are advantages and disadvantages. Let us see the pros and cons of putting your Town Hall outside and inside...
Pros
§ You get a completely free 12 hour shield when someone decides to attack your Town Hall.
§ Chances are that the attackers will target your Town Hall, and then leave you alone.
§ If you are farming, lower levels might attack your Town Hall. This offers an extremely important advantage for raiding (this also counts for non-farmers), you can view how much Gold, Elixir/Dark Elixir he or she has, check out the defenses without the 30 second timing before attacking commences. Revenge Raids are, in my opinion, the best type of raid you can possibly get in Clash of Clans.
Cons
§ You are more likely to lose lots of trophies when you put your Town Hall outside.
§ If you farm, lower levels can attack your Town Hall (if it is a completely unprotected area) and get 1000 of both Gold and Elixir. This may seem a lot at the start, but it is in reality nothing compared to later on.
§ Trophies can get you into a better clan.
I, myself must not influence you in any way, as it is your choice. Balance the pros and cons, and see if you need to save up for a Town Hall upgrade or need to get into your friends clan. It is your choice.
Achievements
Now, because there are so many Achievements out there, I will only show you how to grab the harder to get ones, such as getting the third star on the infamous Sweet Victory! achievement. Let us begin!
Get those Goblins!
1 Star-Win 10 stars on the Campaign Map: 10 Experience / 5 Gems
2 Star-Win 50 stars on the Campaign Map: 100 Experience / 10 Gems
3 Star-Win 150 stars on the Campaign Map: 1000 Experience / 20 Gems
Solution: This is a very time consuming achievement, and must be done over time... Click here to check out the full walkthrough.
Release the Beasts
1 Star-Unlock Archer in the Barracks: 10 Experience / 5 Gems
2 Star-Unlock Wall Breaker in the Barracks: 100 Experience / 10 Gems
3 Star-Unlock Dragon in the Barracks: 1000 Experience / 20 Gems
Solution:You can safely hide up to 450k Elixir by filling the training queue of your Barracks with Wall Breakers, which has the highest Elixir per unit slot of 3000 at level 5, when your Army Camps are full. Cancel the training to get the Elixir back, and continue until you have unlocked every Warrior out there!
Sweet Victory!
1 Star-Win 75 Trophies in Multiplayer Battles: 10 Experience / 5 Gems
2 Star-Win 750 Trophies in Multiplayer Battles: 100 Experience / 10 Gems
3 Star-Win 1,250 Trophies in Multiplayer Battles: 1000 Experience / 450 Gems
The Wolf among the sheep, this is regarded as one of the hard achievements- until you achieve it. To complete this, find those farmers who put their Town Hall outside- and PROFIT!
Conqueror
1 Star-Win 25 Multiplayer Battles: 10 Experience / 5 Gems
2 Star-Win 250 Multiplayer Battles: 100 Experience / 10 Gems
3 Star-Win 5,000 Multiplayer Battles: 1000 Experience / 20 Gems
Fortunately, this method is the same as the Sweet Victory! Achievement- find those farmers who put their Town Hall outside, and destroy it- like a boss.
Unbreakable
1 Star-Successfully defend against 10 attacks: 10 Experience / 5 Gems
2 Star-Successfully defend against 250 attacks: 100 Experience / 50 Gems
3 Star-Successfully defend against 5,000 attacks: 1000 Experience / 100 Gems
Solution: Push back those cups! To put it simply, lower your trophy count. I once pushed my trophy count to the 300-400 trophy range and believe it or not- I earned 214 attacks, mostly from those people who are trying to drop their trophies to the sub 100 and become a farmer.
Friend in Need
1 Star-Donate 100 troops to your clanmates: 10 Experience / 5 Gems
2 Star-Donate 5,000 troops to your clanmates: 100 Experience / 25 Gems
3 Star-Donate 25,000 troops to your clanmates: 1000 Experience / 250 Gems
Solution: Find those clan and donate Tier 2 or Tier 3 Troops to clanmates, as this will fill up the clan castle extremely quickly.
If that clan has an Archer Only policy or similar, then you will have to co operate, as there is no way out of this except by leaving the clan.
Mortar Mauler
1 Star-Destroy 25 Mortars in Multiplayer battles: 10 Experience / 5 Gems
2 Star-Destroy 500 Mortars in Multiplayer battles:: 100 Experience / 10 Gems
3 Star-Destroy 5000 Mortars in Multiplayer battles:: 1000 Experience / 20 Gems
Solution: Send those Giants! Add a Healing Spell if the Mortar is placed quite deeply in the base.
Heroic Heist
1 Star-Steal 20,000 Dark Elixir: 10 Experience / 5 Gems
2 Star-Steal 250,000 Dark Elixir: 100 Experience / 10 Gems
3 Star-Steal 1,000,000 Dark Elixir: 1000 Experience / 20 Gems
Solution: The most challenging Achievement to get when you have Town Hall level 7 and a Dark Elixir Storage is this. This tactic can also be used for grabbing Dark Elixir in general, as well. What is it? Lighting Spells. (Yes, I know- how unoriginal!)
Well, anyways, thanks for reading my guide to Clash of Clans! :)
Note: You can copy paste this article for yourself.
Cool Facts:
Jorge Yao is the world's top player! Here is a picture of his village layout a few months ago.
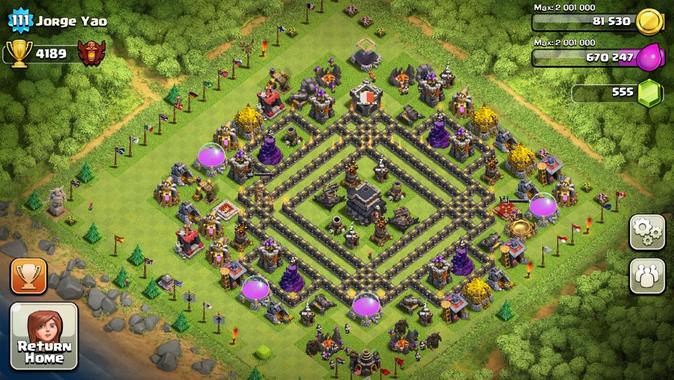
The best clan in the world is currently Quantum's Web. Here is a picture of a member of the Quantum's Web clan below.
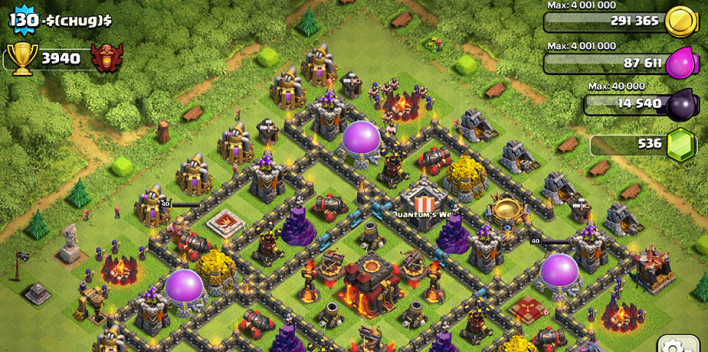
Well, that's all for now! Thanks for reading! And tell your friends!
-Leeguy33
-Leeguy33
